
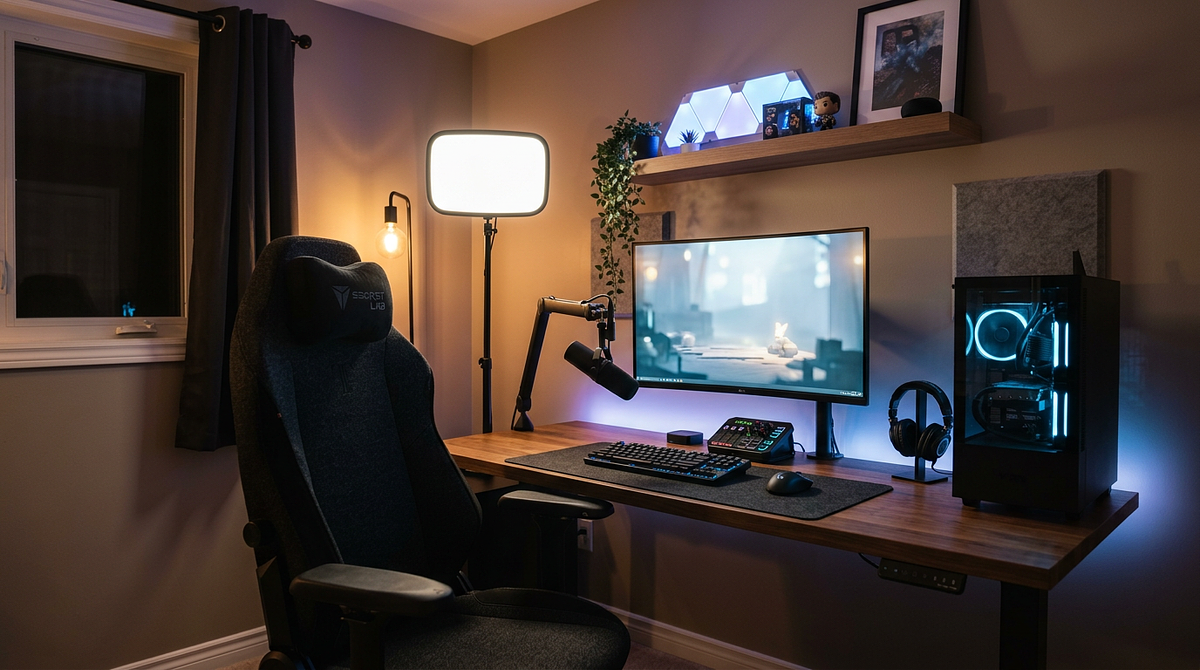
Streaming room ideas cover the practical and visual decisions that go into building a space that looks good on camera and holds up through long sessions. This page walks through room setups across different budgets, with equipment lists and guidance on lighting, acoustics, and background composition. Whether you’re working with a bedroom corner or a dedicated studio, the information here will help you plan a setup that fits your space and your content.
Streaming Room Ideas by Setup Style
Different types of streaming content call for different room setups. Gaming streams work well with RGB lighting and multi-monitor configurations, while talk shows need clean backgrounds and professional lighting. Knowing which style fits your content helps you spend money on the things that actually matter for your specific broadcast.
RGB Gaming Streaming Rooms
RGB lighting is everywhere in gaming streaming setups because it creates visual energy that matches fast-paced gameplay and gives viewers that familiar gaming aesthetic. The trick is balancing colorful ambiance with functional lighting that doesn’t wash out your webcam image or create distracting reflections on your monitors.
- Install addressable LED strips behind monitors and under desks for synchronized color effects that respond to gameplay or music
- Use RGB backlighting on monitors to reduce eye strain during long sessions while adding depth to your camera frame
- Position color-changing LED panels on walls behind your setup to add geometric visual interest without cluttering desk space
- Invest in smart lighting controllers that let you save color presets for different games or stream moods
- Avoid over-saturation by limiting RGB to two or three accent areas rather than covering every surface — too much color creates visual chaos
- Budget range: $150-400 for quality RGB lighting that covers a full gaming setup
Common mistake: Using only RGB lighting without proper face illumination creates dramatic shadows that make you look unprofessional on camera. Always pair RGB accents with dedicated broadcast lighting on your face. For a deeper look at product options and placement strategies, browse this guide to LED lighting placement and products for gaming setups.
Professional Talk Show Streaming Setups
Talk show and podcast streaming rooms put the focus on the host, not the background. Clean backgrounds, professional lighting, and good audio quality matter more than RGB effects because your personality and conversation are what drive the content.
- Choose neutral backgrounds with intentional staging — bookshelves, plants, or minimal wall art that adds depth without competing for attention
- Use three-point lighting with softboxes or LED panels to eliminate unflattering shadows and get professional broadcast quality
- Position your desk to create a natural conversation angle with the camera rather than sitting perfectly centered and stiff
- Install acoustic foam panels on walls behind and beside your microphone to reduce echo and improve voice clarity
- Use a quality lavalier or boom-mounted microphone instead of desk-mounted options to keep equipment out of frame
- Pick furniture that looks professional on camera — solid wood desks and ergonomic chairs rather than gaming-specific gear
This setup style is different from gaming rooms because viewers are watching your face and listening to your voice for extended periods. Poor audio or harsh lighting becomes immediately noticeable and distracting in talk-focused content.
Creative Content Streaming Spaces
Art, music, and craft streaming requires overhead camera angles and clear workspace visibility that standard gaming setups don’t accommodate. Your room design needs to show your hands, materials, and creative process clearly while keeping good lighting across your entire work surface.
- Install adjustable boom arms or ceiling-mounted camera rigs to capture overhead angles of your workspace
- Use bright, color-accurate task lighting that shows materials and colors truthfully rather than creating mood lighting
- Organize materials and tools on visible shelving or pegboards that become part of your background aesthetic
- Position multiple cameras to switch between overhead work views and face-to-camera explanations
- Create dedicated storage zones just off-camera for materials you’ll need during streams without cluttering your visible workspace
- Consider ring lights or large LED panels that provide even illumination across your entire work area
Space efficiency matters more for creative streaming because you need room to move, access materials, and potentially demonstrate techniques that require standing or repositioning equipment mid-stream.
Minimalist Streaming Rooms
A minimalist streaming setup cuts visual distractions for viewers and creates a clean, professional look that works across different content types. This style takes more planning than a cluttered setup because every visible element needs to be there on purpose.
- Mount monitors on articulating arms to eliminate desk clutter and create clean lines in your camera frame
- Route all cables through desk grommets, wall-mounted raceways, or under-desk cable trays to hide wiring completely
- Choose monochromatic color schemes — black, white, or gray equipment and furniture that creates visual cohesion
- Use simple accent lighting like single-color LED strips or small spotlights rather than multi-color RGB effects
- Pick one or two high-quality decorative elements (a plant, a piece of art) rather than filling shelves with items
- Invest in wireless peripherals to reduce visible cables on your desk surface
Budget consideration: Minimalism doesn’t mean cheap. Quality monitor arms, cable management systems, and wireless equipment often cost more than basic alternatives, but the clean result creates a premium appearance on camera.
Multi-Purpose Streaming Corners
Bedroom corners, living room nooks, and shared spaces need streaming setups that can switch quickly between broadcast mode and daily use. Your room design needs modular elements that set up and break down efficiently without permanent installations that take over the space.
- Use compact corner desks (40-48 inches) that give you solid streaming functionality without eating up too much floor space
- Install collapsible green screens or backdrop stands that fold away when you’re not streaming
- Choose lighting on adjustable stands rather than permanent wall mounts so you can reposition or remove lights easily
- Use vertical storage solutions like wall shelves or pegboards that keep equipment accessible but organized
- Pick furniture with built-in storage to hide streaming gear when the space serves other purposes
- Use room dividers or curtains to create temporary visual separation between your streaming area and the rest of the room
Transition strategy: Develop a consistent setup routine that takes 10-15 minutes to transform your corner from daily use to streaming mode. Store frequently used equipment in labeled bins or drawers for quick access.
Streaming Room Setup Essentials by Function
Streaming rooms need different technical considerations than regular gaming spaces because your setup has to perform well on camera, not just work for your own use. Lighting affects how viewers see you, acoustics affect how they hear you, and background composition shapes their perception of your content quality.
Lighting for Broadcast Quality Video
Good lighting is what separates amateur streams from professional-looking broadcasts. RGB strips create aesthetic appeal, but functional broadcast lighting is what actually illuminates your face clearly and gets rid of unflattering shadows that make you look tired or unprofessional on camera.
| Lighting Type | Purpose | Placement | Budget Range |
|---|---|---|---|
| Key Light | Primary illumination of face | 45° angle from camera | $50-200 |
| Fill Light | Soften shadows | Opposite side of key light | $30-100 |
| Back Light | Separate subject from background | Behind and above subject | $40-150 |
| RGB Accent | Background aesthetics | Behind monitors, under desk | $20-100 |
Setup principles for effective streaming lighting:
- Position your key light at eye level or slightly above to create natural-looking illumination without harsh shadows under your eyes or nose
- Avoid overhead lighting from ceiling fixtures — it creates unflattering shadows that age your appearance and look unprofessional
- Use diffusers or softboxes to soften harsh light sources and create even illumination across your face
- Test your lighting setup on camera before finalizing placement — what looks good in person may look different through your webcam
- Match color temperature across all lights (typically 5000-5600K for daylight balance) to avoid strange color casts on your skin
- Angle lights away from your monitors to prevent screen glare that washes out your display in the camera frame
Common mistakes include using only RGB lighting without face illumination, positioning lights too close (which creates hot spots), or mixing warm and cool color temperatures that make skin tones look unnatural.
Acoustic Treatment and Sound Control
Audio quality affects viewer retention more than video quality. People will tolerate lower resolution video, but they’ll leave a stream with echo, background noise, or muffled voices. Basic acoustic treatment dramatically improves broadcast sound without requiring expensive studio construction.
Steps for basic acoustic treatment:
- Find the primary sound reflection points by sitting at your streaming position and having someone hold a mirror flat against the walls — anywhere you can see your microphone’s reflection needs treatment
- Install two to four acoustic foam panels at those reflection points behind and beside your microphone to absorb echo and reduce room reverb
- Add bass traps in room corners if your space has noticeable low-frequency rumble or boomy sound quality
- Test your audio with recording software and adjust panel placement based on results — more panels aren’t always better if they deaden the room too much
Product options for acoustic improvement:
- Acoustic foam panels: $30-80 for a 12-pack that covers 24-32 square feet of wall space
- Bass traps: $40-100 per pair for corner-mounted low-frequency absorption
- Soundproofing curtains: $50-150 for door or window coverage that reduces external noise bleed
- Desk isolation pads: $20-40 to reduce vibration noise from keyboard typing or desk bumps
- Door draft stoppers: $15-30 to seal gaps that let noise from other rooms bleed in
Realistic expectations: Acoustic treatment improves sound quality by reducing echo and controlling reflections, but it won’t create professional studio sound in untreated rooms or block loud external noise like traffic or roommates. For serious noise isolation, you need construction-level soundproofing.
Camera Angles and Background Composition
Your background takes up 60-70% of your camera frame, so it plays a big role in how viewers perceive your content quality. A thoughtful background creates depth and visual interest without pulling attention away from you.
Composition principles for streaming backgrounds:
- Position your camera at eye level or slightly above — never below, which creates an unflattering upward angle that emphasizes your chin and nostrils
- Create depth with layered background elements rather than sitting against a flat wall — use shelves, plants, or lighting at different distances to add dimension
- Apply the rule of thirds by placing yourself slightly off-center in the frame rather than dead-center, which looks static and unnatural
- Keep 6-12 inches of headroom above your head in frame — too little feels cramped, too much makes you look small and unimportant
- Keep background elements symmetrical or intentionally asymmetrical — accidental imbalance looks sloppy rather than artistic
- Make sure nothing in your background moves or changes unexpectedly during streams — closing doors, people walking by, or pets create distractions
Equipment for background control:
- Green screens: $40-150 for collapsible or wall-mounted options that let you replace backgrounds digitally
- Backdrop stands: $50-120 for adjustable frames that hold fabric, paper, or vinyl backgrounds
- Depth-creating elements: Floating shelves ($30-80), artificial plants ($20-60), or LED light panels ($40-100) that add visual layers
- Camera mounts: Desk clamps or wall mounts ($20-50) that position your camera at the correct height and angle
Common background mistakes include cluttered shelves that draw attention away from you, distracting movement from windows or doors, poor depth that makes you blend into the wall, and asymmetrical elements that look accidental rather than intentional.
Desk and Furniture Layout for Multi-Monitor Streaming
A streaming desk needs to fit monitors, a camera, a microphone, lighting controls, and streaming equipment while still keeping you in a comfortable position for long sessions. A poor desk layout creates physical strain and makes it harder to interact naturally with your setup on camera.
| Desk Type | Width | Monitor Capacity | Cable Management | Budget Range |
|---|---|---|---|---|
| Standard Gaming Desk | 48-60″ | 2-3 monitors | Basic grommets | $150-300 |
| L-Shaped Corner Desk | 60-72″ | 3-4 monitors | Built-in trays | $200-500 |
| Standing Desk | 48-72″ | 2-3 monitors | Integrated channels | $300-800 |
| Wall-Mounted Floating | 40-60″ | 1-2 monitors | Concealed routing | $100-250 |
Layout principles for streaming desk setup:
- Position your primary monitor at arm’s length with the top of the screen at or slightly below eye level to prevent neck strain
- Place your camera above or beside your primary monitor so your eye line looks natural when you’re watching chat or gameplay
- Keep your microphone 6-12 inches from your mouth, angled slightly off-axis to reduce plosive sounds from P and B consonants
- Route cables through desk grommets or under-desk cable trays right away rather than letting them pile up — cable management gets exponentially harder as you add equipment
- Keep at least 24-30 inches of desk depth so you have room for your keyboard, mouse, and arm movement without feeling cramped
- Leave 6-12 inches of clear desk space on either side of your keyboard for drinks, notes, or equipment you’ll need during streams
Ergonomic considerations: Adjust your chair height so your feet rest flat on the floor and your elbows form 90-degree angles when typing. Position your keyboard and mouse so your wrists stay neutral rather than bent upward or downward during use. If you want to go deeper on this topic, read this ergonomic gaming setup guide covering monitor positioning, desk height, and chair adjustments.
Streaming Room Budget Tiers and Space Solutions
Your budget and available space will shape your streaming room more than anything else. Knowing what you can realistically accomplish at different price points and in different room configurations helps you build a setup that fits your actual situation.
Budget Tiers for Streaming Room Setup
Spend on audio quality first, lighting second, and aesthetic elements third. Viewers forgive basic backgrounds, but they’ll leave streams with poor sound or dark video. Each tier below represents a complete functional setup, not just a list of gear.
| Budget Tier | Total Cost | Lighting | Audio | Camera | Furniture | Background | Best For |
|---|---|---|---|---|---|---|---|
| Entry-Level | $500-1,000 | Ring light ($50-80) | USB mic ($60-100) | Webcam ($60-120) | Basic desk ($150-250) | DIY backdrop ($30-50) | Beginners testing streaming |
| Mid-Range | $1,000-3,000 | 3-point kit ($200-400) | XLR mic + interface ($250-500) | DSLR/mirrorless ($400-800) | Adjustable desk ($300-600) | Acoustic panels + decor ($150-300) | Regular streamers building audience |
| Premium | $3,000-6,000+ | Professional softboxes ($500-1,000) | Broadcast mic + mixer ($600-1,200) | Cinema camera ($1,000-2,500) | Standing desk + chair ($800-1,500) | Custom build + treatment ($400-800) | Full-time content creators |
Upgrade priority when moving between tiers: Improve your microphone and audio interface before upgrading your camera. Clear voice quality has a bigger impact on perceived professionalism than higher resolution video. After audio, invest in proper lighting before spending on aesthetic room elements.
Dedicated Room Streaming Setups
A dedicated streaming room lets you leave equipment in place permanently, get better acoustic control, and build the space entirely around broadcast needs without setting up and tearing down every time. The minimum recommended size is 8×10 feet for comfortable equipment arrangement and room to move around.
Layout strategies for dedicated streaming rooms:
- Position your desk facing away from windows to control natural light that changes throughout the day and creates inconsistent video quality
- Use corner placement to open up wall space for acoustic treatment and background staging
- Create distinct equipment zones — a streaming area for your desk and camera, a storage area for backup gear, and a prep area for organizing content materials
- Install permanent cable management along baseboards and walls using raceways or conduit rather than temporary solutions
- Consider room-darkening curtains or blackout shades for consistent lighting conditions regardless of time of day
- Add a small fan or portable AC unit if your room lacks ventilation — streaming equipment generates significant heat during long sessions
Dedicated rooms let you leave equipment powered on and ready, cutting setup time from 15-20 minutes down to simply sitting down and starting your stream.
Bedroom Corner and Shared Space Solutions
Bedroom corners and shared living spaces need streaming setups that coexist with daily life without taking over the room. Space-saving strategies and dual-purpose furniture let you maintain a functional streaming setup while preserving the room’s primary use.
Space-saving strategies for shared spaces:
- Choose corner desks (40-48 inches) that give you solid streaming functionality without consuming too much floor space
- Install wall-mounted monitor arms to free up desk surface area for other uses when you’re not streaming
- Pick foldable or retractable backgrounds that set up in two to three minutes and store flat against walls or in closets
- Use vertical storage with wall shelves or pegboards that keep streaming equipment accessible but organized above desk level
- Use wireless peripherals to reduce cable clutter in tight spaces where wire management is difficult
- Position your setup in the corner farthest from the room’s main entrance to cut down on background traffic during streams
Noise management for shared spaces: Use directional cardioid microphones that reject sound from behind and beside you, set streaming schedules that avoid high-traffic times, and install door draft stoppers to reduce noise bleed from adjacent rooms. For more layout strategies tailored to tight spaces, see this guide to gaming setup ideas for small rooms.
Closet Conversion Streaming Rooms
Closet conversions are a solid option for homes without a spare room. Walk-in closets (minimum 5×6 feet) give you built-in acoustic dampening from walls on three sides, controlled lighting without windows, and a clear mental separation between streaming and living spaces.
Conversion steps for closet streaming rooms:
- Remove closet doors and install a curtain or sliding door for easy access while still being able to close off the space
- Add active ventilation with a small desk fan or AC vent to prevent heat buildup from equipment in the enclosed space
- Install a wall-mounted desk or floating shelf (24-30 inches deep) to get the most out of the small footprint
- Mount lighting on the closet ceiling or upper walls rather than using floor stands that eat up valuable space
- Use closet walls for acoustic foam panels and cable routing — the existing structure gives you mounting surfaces on three sides
- Check for electrical outlet access or run a heavy-duty extension cord with surge protection to power your equipment safely
Heat management is critical in closet conversions because the enclosed space traps warmth from computers, monitors, and lighting. Plan for active airflow from the beginning rather than adding it after you’ve already cooked through a few uncomfortable streams.
Building Your Streaming Room: Strategic Planning for Broadcast Success
A good streaming room balances aesthetic inspiration with functional broadcast requirements. Focus on lighting and audio quality before visual flair, then layer in design elements that add to your content rather than distract from it. Your room should support long streaming sessions comfortably while looking professional on camera.
Start with your content type and space constraints to figure out which setup style and budget tier fits your needs, then build systematically rather than buying everything at once. Test each component’s impact on your stream quality before adding the next element. Browse equipment guides and room planning templates to map out your specific streaming space before making purchases.
Frequently Asked Questions About Streaming Room Ideas
Do room aesthetics actually matter for streaming success?
Room aesthetics influence how professional and polished your content looks, but they matter less than audio clarity and consistent lighting. Viewers will tolerate a basic background if your voice sounds clear and your face is well-lit. Spend on functional elements first, then add aesthetic touches that reinforce your content brand.
Can I stream effectively from a small apartment bedroom?
Yes, bedroom corner setups work well with compact desks (40-48 inches), wall-mounted equipment, and strategic background framing that shows only your curated streaming area rather than the full room. Use directional microphones and schedule streams during quieter hours to manage noise in shared living spaces.
How important is a green screen for streaming room backgrounds?
Green screens are optional unless you plan frequent background changes or need to hide space limitations. Most successful streamers use physical backgrounds with depth-creating elements like shelves, plants, and accent lighting. Green screens require additional lighting to avoid color spill and work best in dedicated rooms with space for proper setup.
Should I prioritize RGB lighting or broadcast lighting for my streaming room?
Focus on broadcast lighting (key, fill, and back lights) for video quality first, then add RGB accent lighting for aesthetic appeal. RGB alone creates visual interest but often produces unflattering shadows and color casts on your face. Combine both types with broadcast lights on your face and RGB behind monitors or under your desk.
What’s the minimum space needed for a functional streaming room?
A 5×6 foot area gives you enough space for a compact desk, chair, and basic equipment, which makes closet conversions and bedroom corners viable options. Dedicated streaming rooms benefit from at least 8×10 feet to fit a full desk setup, acoustic treatment, and comfortable movement space.
How do I prevent my streaming room from overheating with all the equipment?
Heat management often gets overlooked until it becomes a real problem. LEDs, strategic equipment placement, and active airflow (even a simple desk fan) can make a surprising difference in small or enclosed spaces. If you’re building out your setup from scratch, factoring in ventilation early saves a lot of frustration later. Browse our streaming room setup guides to plan smarter from the start.