
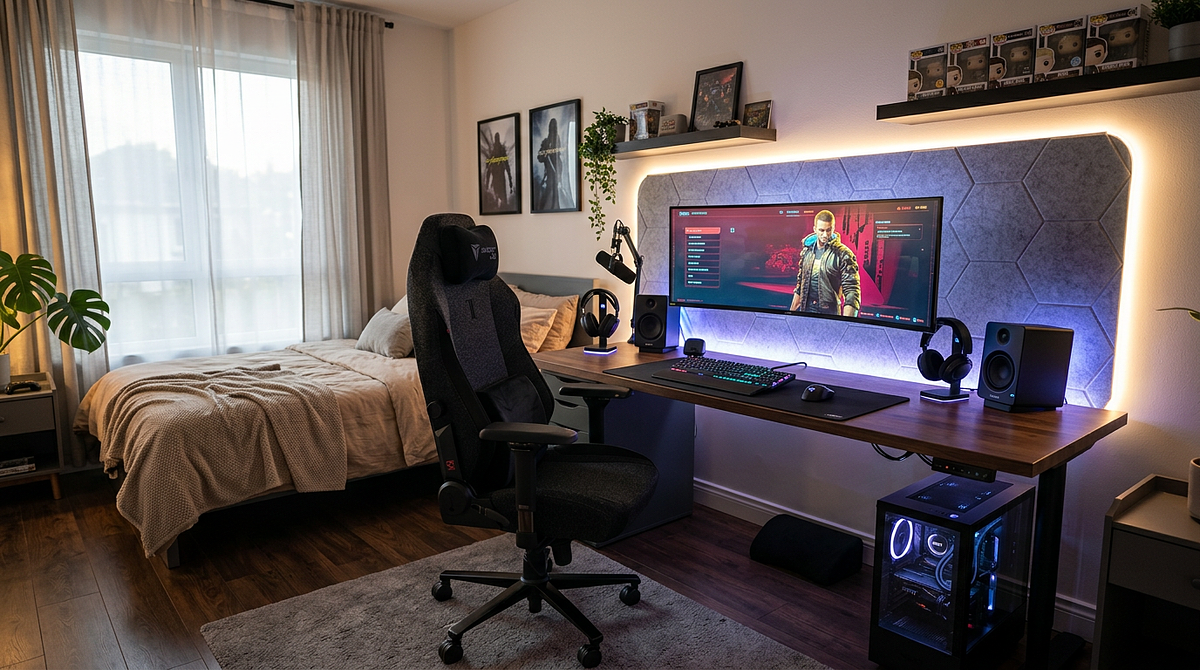
Gaming room ideas work for all kinds of spaces and budgets, from a bedroom corner to a fully dedicated room. This guide covers setup options organized by budget, room size, and purpose, including PC gaming, console, streaming, and multi-use configurations. You’ll find measurements, product categories, and cost breakdowns for each approach. By the end, you’ll have enough information to plan a setup that fits your space and your budget.
Gaming Room Setup Ideas Organized by Budget Tier
Knowing your budget before you start shopping helps you avoid spending too much on low-impact items while missing the things that actually matter. The difference between budget tiers isn’t just about spending more money. It’s about what you’re able to focus on. Lower budgets are all about ergonomic function and basic organization. Mid-tier builds balance looks with performance. And premium setups open the door to streaming, content creation, and more immersive environments.
| Budget Tier | Core Focus | Essential Investment | Skip/Delay | Estimated Total |
|---|---|---|---|---|
| Under $500 | Function over form | Desk, chair, basic lighting | Premium aesthetics, multiple monitors | $400-500 |
| $500-$1500 | Balanced setup | Quality ergonomics, dual displays, RGB system | Custom builds, premium brands | $1200-1500 |
| $2000+ | Immersive experience | Standing desk, premium chair, multi-monitor, streaming gear | Diminishing return upgrades | $2500-4000 |
Under $500: Starter Gaming Room Essentials
At this budget, comfort comes before looks. The goal is to build a foundation that keeps you comfortable during long sessions and stays organized enough to upgrade later without starting over from scratch.
- Basic gaming desk ($80-150): Look for simple rectangular desks with 48-60 inch width and 24-30 inch depth. That gives you enough room for a monitor, keyboard, and mouse without paying for features you don’t need yet.
- Entry-level ergonomic chair ($100-200): Focus on adjustable seat height and basic lumbar support rather than racing-style looks or premium materials.
- LED strip lighting ($15-30): A single-color bias light behind your monitor reduces eye strain more effectively than an expensive RGB system at this budget.
- Cable management basics ($20-40): Under-desk cable trays and velcro ties keep cords from tangling and improve airflow around your equipment.
- Wall-mounted shelving or modular storage ($50-100): Vertical storage keeps your desk clear for gaming peripherals.
- Budget monitor arm or stand ($30-60): Getting your monitor at the right height prevents neck strain and frees up desk space.
- Basic acoustic treatment ($40-80): DIY foam panels cut down on echo in small rooms, which improves audio quality for gaming and voice chat.
A common mistake at this tier is spending too much on decorative items before sorting out ergonomics, or buying furniture that’s too small and needs replacing when you upgrade your gear. Start with the right desk and chair dimensions, then add aesthetic touches as your budget grows.
$500-$1500: Mid-Tier Gaming Room Build
This budget range lets you get quality ergonomics and some aesthetic personalization without sacrificing either. You can address both comfort and looks at the same time.
- Quality adjustable desk ($200-400): Look for cable management grommets, sturdy construction that supports 100+ pounds, and enough depth (28-30 inches) to place your monitor at a proper viewing distance.
- Ergonomic gaming chair with lumbar support ($250-450): Adjustable armrests, seat depth, and recline tension make a real difference during sessions that run three hours or longer.
- RGB lighting system with smart controls ($60-120): Programmable color scenes let you adjust lighting for different activities, like gaming, streaming, or winding down, without having to fiddle with settings each time.
- Professional cable management solutions ($50-100): Raceways, cable sleeves, and mounting clips create clean routing paths that make troubleshooting and equipment swaps much easier.
- Modular shelving system ($150-250): Cube-style shelving gives you flexible storage for games, collectibles, and equipment. It can also work as a visual room divider in shared spaces.
- Dual monitor setup or ultrawide display ($300-600): More screen space helps with productivity and lets you keep chat or streaming software visible while you play.
- Acoustic panels and soundproofing ($100-200): Fabric-wrapped panels in coordinating colors pull double duty as sound treatment and wall decor.
- Decorative elements ($80-150): Game-themed posters, LED signs, or collectible displays add personality without taking over the space.
At this tier, spend on the things you interact with every day, like your chair and desk, before adding multiple monitors or advanced lighting. That’s where the extra budget does the most work.
$2000+: Premium Gaming Room Experience
At this budget, you can build a streaming-ready setup that works for both gaming and content creation. The focus here is on pieces that hold up and stay useful over years of daily use.
- Standing/motorized desk system ($500-1000): Programmable height presets let you change positions throughout long sessions, which reduces fatigue and keeps circulation going.
- Premium ergonomic chair ($400-800): High-end models with mesh backing, 4D armrests, and extended warranties hold up better and stay comfortable during daily multi-hour use.
- Advanced RGB ecosystem with sync capabilities ($150-300): Unified lighting control across strips, bulbs, and peripherals lets you build cohesive scenes that respond to in-game events or streaming alerts.
- Professional cable management and wire concealment ($100-200): In-desk cable channels, floor raceways, and custom-length cables get rid of visible wiring entirely.
- Custom shelving or built-in storage solutions ($400-800): Fitted storage makes the most of awkward spaces and gives you dedicated spots for equipment, games, and collectibles.
- Multi-monitor array or premium ultrawide ($800-1500): Three-monitor setups or 34+ inch ultrawides with high refresh rates handle competitive gaming, streaming, and productivity at the same time.
- Professional acoustic treatment and soundproofing ($300-600): Bass traps, diffusers, and higher-density panels tune your room’s acoustics for recording or competitive audio positioning.
- Theme-specific decor and display cases ($200-500): Illuminated shelving, custom artwork, or collectible displays create focal points that reflect your gaming interests.
- Climate control considerations ($150-400): Dedicated cooling solutions keep equipment from throttling and maintain a comfortable temperature in rooms with multiple heat-generating devices.
Watch out for diminishing returns at this level. Spending an extra $500 on a chair beyond the $600-800 range rarely gives you proportional comfort gains. Put premium spending toward things that unlock new capabilities, like streaming equipment or multi-monitor productivity, rather than marginal upgrades to categories you’ve already covered.
Gaming Room Layout Ideas for Different Space Types
Room dimensions shape your furniture choices, layout options, and storage strategy more than anything else. A setup that looks great in a 12×15 dedicated room will feel cramped and awkward in an 8×8 bedroom corner. Knowing your space constraints before you buy furniture saves you from costly mistakes and keeps traffic flow comfortable.
Small Spaces and Bedroom Corners (Under 8×8 feet)
Small gaming rooms need vertical thinking and multi-function furniture to make the most of limited floor space. Every piece should serve more than one purpose or use wall space instead of eating up floor area. For a deeper look at layout strategies and furniture choices built specifically for tight spaces, our guide on gaming setup ideas for small rooms covers measurement-based approaches and desk configurations that work when square footage is limited.
- Wall-mounted desk solutions: Floating desks or fold-down surfaces free up floor space and can be tucked away when not in use, which is especially useful in shared bedrooms.
- Vertical shelving systems: Floor-to-ceiling units (72+ inches tall) give you a lot of storage without expanding the room’s footprint.
- Compact gaming chair or ergonomic stool: Look for chairs with smaller bases (20-22 inch width) that still offer ergonomic support while fitting into tighter spaces.
- Under-desk storage and cable routing: The 24-30 inches of vertical space under your desk is useful real estate. Fill it with drawer units or mounted organizers.
- Fold-down or retractable elements: Monitor arms, keyboard trays, and swing-out shelves let you reclaim space when you’re not gaming.
- Lighting that creates depth: Bias lighting and corner-mounted LED strips make small rooms feel bigger without taking up any physical space.
Keep at least 30 inches of clearance behind your chair so you can move comfortably. Choose desks with 20-24 inch depth rather than standard 30-inch models. The most common mistakes in small spaces are oversized gaming chairs that dominate the room and cluttered surfaces that make everything feel even more cramped.
Standard Bedrooms and Office Conversions (8×10 to 10×12 feet)
Standard room sizes give you real flexibility. You can fit L-shaped configurations, dual-purpose zones, and comfortable traffic flow. These dimensions work with full-size gaming furniture while leaving room for other uses.
- L-shaped desk configurations: Placing a desk in the corner gets you a lot of usable surface area (60+ inches on each leg) while keeping the center of the room open for movement.
- Dual-purpose setups: Separate your gaming zone from your work or study area using furniture placement or room dividers. That physical separation helps mentally too.
- Strategic furniture placement: Position your desk perpendicular to doors to cut down on distractions from hallway traffic, and keep walking paths at least 36 inches wide.
- Monitor positioning: Place screens perpendicular to windows rather than directly facing them to cut down on glare during daytime gaming.
- Storage solutions as room dividers: Bookshelf units or modular cubes create visual separation between gaming and sleeping areas in bedroom conversions.
- Acoustic treatment placement: Mount panels on the wall behind your monitors and at first reflection points (side walls at ear level) for the best sound quality.
- Lighting zones: Separate task lighting (desk lamp), ambient lighting (overhead or floor lamps), and accent lighting (LED strips) so you can adjust brightness for different activities.
A sample layout for a 10×12 room puts a 60-inch desk against the longest wall, leaves 40 inches of clearance behind the chair, and uses the opposite wall for shelving or console gaming seating. Pay attention to door swing direction and window placement when arranging furniture so you’re not blocking natural light or creating awkward traffic patterns.
Dedicated Gaming Rooms (12×15 feet and larger)
A dedicated room gives you space for multi-station setups, streaming areas, and comfortable seating for spectators without cramping your main gaming zone. These rooms also support things like advanced lighting scenes and professional acoustic treatment.
- Multi-station setups: Give PC and console gaming their own distinct areas. Use a desk chair for PC gaming and a couch or recliners positioned 6-10 feet from the TV for console play.
- Streaming/content creation areas: Set aside about 4×6 feet for camera positioning, lighting equipment, and a green screen if streaming is part of your plan.
- Comfortable seating zones: Add a couch or bean bag seating for spectators during multiplayer sessions or co-op gaming.
- Display walls: Dedicate one wall to collectibles, achievement displays, or game art using illuminated shelving or a gallery-style arrangement.
- Advanced lighting scenes: Program separate modes for competitive gaming (minimal distraction), streaming (camera-friendly), and ambient relaxation (low-intensity colored lighting).
- Climate control and ventilation: Plan for adequate cooling with ceiling fans or portable units. Multiple gaming systems and monitors generate a lot of heat.
- Acoustic optimization: Treat all four walls with a mix of absorption panels and diffusers for recording-quality audio or competitive sound positioning.
- Cable management infrastructure: Install in-wall cable routing or floor channels during the initial setup to handle multiple stations without visible wire runs.
Split your space into active gaming (40-50% of floor area), passive viewing and seating (30-40%), and storage and display (10-20%). Think about electrical outlet placement too. You’ll need multiple circuits to run gaming PCs, monitors, consoles, and streaming equipment without tripping breakers. Ventilation matters when you have a lot of heat-generating equipment running at once. Aim to keep the room between 68-72°F for both your comfort and your gear’s performance.
Non-Traditional Spaces (Basements, Attics, Closets, Garages)
Unconventional gaming spaces come with real challenges, but they often give you a dedicated area without taking over prime living space. Each type of space needs specific fixes to deal with its environmental or structural quirks.
- Basement moisture control: Use dehumidifiers to keep relative humidity between 30-50% to protect equipment from condensation damage. Add extra lighting to make up for the lack of natural light.
- Attic temperature regulation: Insulate the walls and ceiling to manage extreme temperatures, and install proper ventilation or an AC unit since attics trap heat.
- Closet gaming nooks: Remove closet doors or install sliding or pocket doors to create an integrated gaming alcove. The existing closet depth (24-30 inches) works naturally as desk space.
- Garage conversions: Deal with insulation, climate control, and security upfront. Garages need weatherproofing, dedicated HVAC, and secure locks to protect expensive equipment.
- Shared space strategies: In living rooms or family rooms, use furniture on wheels or modular setups that can be moved when the space needs to serve other purposes.
- Portable/modular setups: If you rotate between spaces or need to temporarily reclaim the area, invest in equipment that breaks down easily.
Check local building codes before converting a garage or attic. You may need permits for electrical work, HVAC installation, or egress windows. Basements need proper ventilation and moisture barriers to prevent mold from growing around electronics. On top of standard gaming room costs, budget an extra $500-1500 for environmental controls like dehumidifiers, insulation, and ventilation when converting non-traditional spaces.
Gaming Room Lighting, Cable Management, and Finishing Touches
The finishing touches are what turn a functional gaming space into one you actually want to spend time in. They also handle practical concerns like eye strain, cable clutter, and equipment heat, all of which affect both daily comfort and long-term gear maintenance.
Lighting Design for Gaming Performance and Ambiance
Good lighting cuts down on eye strain during long sessions and sets the mood without creating screen glare or harsh shadows. The right combination of light sources handles both the functional and aesthetic sides at once.
- Bias lighting behind monitors: LED strips mounted behind your display reduce eye strain by lowering the contrast between a bright screen and a dark wall. They also improve perceived image contrast and color accuracy.
- RGB LED strips for customizable ambient lighting: Adjustable color temperature (2700K warm white for relaxing, 5000K cool white for focus, colored modes for ambiance) lets you match your lighting to what you’re doing.
- Smart lighting systems with scene presets: Program one-touch scenes for gaming (moderate brightness, minimal distraction), streaming (camera-friendly front lighting), and relaxation (low-intensity colored lighting).
- Task lighting for keyboard visibility: A small desk lamp with an adjustable arm gives you localized light without creating screen glare. It’s especially useful with mechanical keyboards or when you’re taking notes.
- Indirect/diffused lighting: Bouncing light off walls or ceilings instead of using direct overhead fixtures cuts harsh shadows and reduces glare on glossy monitor surfaces.
- Blackout solutions: Blackout curtains or cellular shades control daytime glare, which is especially important if your windows face your monitors.
- Budget alternatives: Smart LED bulbs in existing fixtures ($15-25 each) give you color control without installing strip lighting. Battery-powered LED strips ($12-20) add accent lighting without any electrical work.
Position monitors perpendicular to windows rather than facing them directly, and avoid placing light sources in your field of view while you play. Color temperature between 2700K-3000K reduces blue light exposure during evening gaming. Going up to 4000K-5000K improves alertness for competitive play or streaming. For a full breakdown of LED product types, placement strategies, and brand comparisons, see our guide on building a gaming setup with LED lights.
Cable Management and Organization Systems
Organized cables make your setup look better and work better. They simplify troubleshooting, improve airflow around equipment, and eliminate tripping hazards. Good cable management also makes upgrades easier since you can trace connections without digging through a tangled mess of wires.
- Under-desk cable trays and raceways ($15-40): Metal mesh trays or plastic channels mounted under your desk route power cables and data lines out of sight while keeping them accessible.
- Velcro cable ties and sleeves ($10-25): Reusable velcro ties bundle multiple cables together. Fabric sleeves hide bundled cables running along walls or desk legs.
- Cable clips and anchors ($8-20): Adhesive clips guide individual cables along desk edges or walls and keep them from falling behind furniture.
- Power strip mounting and surge protection ($25-60): Mounting power strips to the underside of your desk or to a wall centralizes power distribution and protects equipment from voltage spikes.
- Wireless peripheral adoption: Switching to wireless keyboards, mice, and headsets removes 3-4 cables from your desktop surface right away.
- Labeling systems: Use a label maker or colored tape to mark cables at both ends. When you need to disconnect something specific, you’ll be glad you did.
Start with the cables you can see on your desktop, then work on hidden routing under the desk and behind furniture. Leave some slack in your cable runs rather than pulling them tight. That prevents stress on connectors and gives you room for minor furniture adjustments. When possible, avoid bundling power cables with data cables, since electrical interference can cause signal issues with USB or audio connections. If you want step-by-step product recommendations and routing strategies, our gaming desk cable management guide for beginners covers everything from quick fixes to full under-desk builds.
Gaming Room Decor and Personalization
Decor makes your space feel like yours while keeping things visually cohesive. The goal is personalization without clutter. Each decorative item should add to the room’s overall look rather than compete with everything else around it.
- Wall art and posters: Frame game-themed prints, minimalist character art, or custom canvas prints instead of thumbtacking posters to the wall. It looks a lot more polished.
- Collectible displays: Give figures, limited editions, or gaming memorabilia their own dedicated shelving or display cases with LED lighting. That keeps them visible without creating desktop clutter.
- Color scheme coordination: Pick 2-3 primary colors that show up in your lighting, furniture, and decor. Too many competing colors make a space feel chaotic.
- Acoustic panels as decorative elements: Fabric-wrapped sound panels in custom colors improve audio quality and add visual interest to blank walls at the same time.
- DIY projects: Custom desk mods (painted surfaces, LED integration), accent walls in coordinating colors, or handmade cable management solutions add personality without spending much.
- Plants and natural elements: Low-maintenance plants like pothos, snake plants, or succulents add life to a gaming space and improve air quality.
- Themed elements without overwhelming: Pick one or two focal points, like a large poster, an illuminated logo, or a display shelf, rather than covering every surface with gaming references.
- Budget-friendly upgrades: Removable wallpaper accent walls ($30-60), LED neon signs ($25-80), or vinyl wall decals ($15-40) create a strong visual impact without permanent changes.
Keep personalization balanced with functionality. Avoid placing collectibles where they’ll collect dust or block your monitor viewing angles. If you’re renting, removable wallpaper, command strips for hanging art, and freestanding furniture let you personalize without risking your security deposit. Keep your desktop mostly clear, with no more than 1-2 decorative items on the surface so you have room for peripherals and arm movement.
Building Your Gaming Room in Phases
The best gaming room transformations happen in stages, not all at once. Start with ergonomic basics like a desk, chair, and lighting that keep you comfortable during long sessions. Then layer in performance upgrades like monitors and peripherals. Finish with personalization: decor, advanced lighting, and display setups. This approach keeps you from blowing your budget all at once and lets you figure out what actually improves your experience before committing to expensive upgrades. Pick your budget tier and room size from this guide, then focus on the top three things that address your biggest pain points, whether that’s discomfort, clutter, or poor lighting. Check out our detailed gaming desk and chair comparison guides to make solid decisions on your foundational investments.
Frequently Asked Questions About Gaming Room Ideas
How can I design a gaming room that works for multiple purposes (streaming, PC gaming, console gaming)?
Set up distinct zones within your space. Position your PC setup for streaming with proper camera angles and lighting. Place your console gaming area near comfortable seating with TV viewing distance (6-10 feet for most screen sizes). Use modular furniture that adapts between configurations, and invest in cable management that handles switching between setups without creating a visual mess.
What’s the best way to reduce screen glare in a gaming room with windows?
Install blackout curtains or cellular shades to control natural light, and position monitors perpendicular to windows rather than directly facing them. Adding bias lighting behind your monitors also reduces eye strain and improves perceived contrast in any lighting condition.
How do I choose between RGB lighting and single-color LED strips for my gaming room?
RGB systems ($40-150) give you flexibility for mood changes and streaming scene variety. Single-color LEDs ($15-40) provide consistent ambiance at a lower cost. Go with RGB if you stream or like to change your room’s look often. Go with single-color if you want a set-it-and-forget-it solution focused on reducing eye strain.
What gaming room accessories provide the best value for improving comfort during long sessions?
A quality ergonomic chair with adjustable lumbar support ($200-450) and a desk at the right height (28-30 inches for most people, or an adjustable standing desk) make the biggest difference in comfort. Add a footrest ($20-40) and a monitor arm ($30-100) to fine-tune your posture and reduce neck and back strain.
How can I soundproof my gaming room on a budget?
Focus on acoustic treatment rather than true soundproofing. Add foam panels or DIY fabric-wrapped insulation to your walls ($40-100), put a thick rug under your gaming area, and use weatherstripping on doors ($15-30). These steps reduce echo and dampen sound transmission without any expensive construction.
What’s the ideal room temperature for a gaming room with multiple monitors and a gaming PC?
For gaming setups running multiple monitors and a full PC, 68-72°F (20-22°C) hits the sweet spot. It’s cool enough to offset the heat your equipment generates and comfortable enough to keep you focused during long sessions. A well-placed fan handles airflow without the noise or draft trade-offs, and if you’re ready to dial in your full setup, exploring dedicated gaming room cooling solutions can make a real difference.